Formula to work out stopping distances.

One of the parts of the theory test that people always say they struggle to remember is the stopping distances.  Well there is a formula to help you work them out, so as long as you can remember the formula and are abel to do the simple maths then you would be able to work out the distance when taking your test.

The formula is.  speed x first number, divided by 2, plus the initial speed.

To work out the 30 mph stopping distance, which is 75ft.

30 X 3 = 90.  90/2 = 45.  45 + 30 = 75.

To work out the 40 mph stopping distance, which is 120ft.

40 X 4 = 160.  160/2 = 80.  80 + 40 = 120

This continues to work through the rest of the speeds.

The next thing to remember is what effect that the weather will have on the stopping distance.

Rain/wet weather can double the distance needed to stop.

Snow and ice can increase it by as much as ten times.

Posted in Uncategorized | Leave a comment

Common lane fault while negotiating Denbigh Roundabout

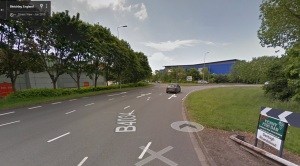
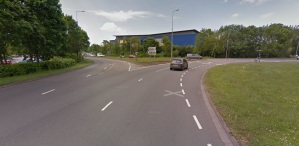
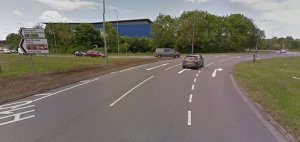
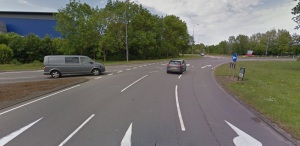
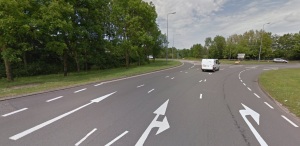
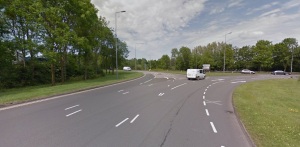
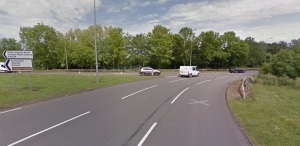
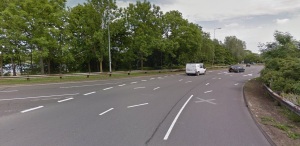
A common fault that I regularly see while driving on the Denbigh Roundabout (IKEA) in Bletchley is to do with lane discipline around the entrance to the roundabout from Bletcham Way West.  I feel this is to do with the road markings and peoples ability to read them correctly.   Below I have collected a series of 9 screen grabs from Google Maps traveling from the entrance from Saxon st south (B&Q roundabout) to the exit onto Bletcham Way East.

ikea1This first photo is as you enter the inner lane with B&Q on your far left.  At this point the grey car in front is in the correct lane for where we are heading, although it is position a little too far to the left in the lane.

ikea2At this point we are still following the grey car and the road marking are clear and we can see them pushing us from the inner to the middle lane.

ikea3Again all looks simple following the grey car,  we can see the arrow road markings here showing us that the left lane is for ahead next exit, middle lane is also next exit but also right and the right lane is for right only.

ikea4This is where it starts to get a little tricky as we have the road from Bletcham Way joining from our left.  We still need to stay in the middle lane.

ikea5This is about the position that most people start to go wrong.  As can be seen on the right hand side of the photo, the road markings start to push the lanes outwards.  So our lane starts to move from the middle to the left lane.  We should be following the white van now across to the left lane.  The marking that I feel confuses most here is the line just to the left of the middle arrows.  It is angled to take cars entering from Bletcham Way in towards the middle and inner lane, but because of its angle people see it and think it’s to push them into the middle lane next to the white van.

ikea6This image is a little further around the roundabout and in this shot the camera car has stayed on the inner lane.  Again people traveling on the route we were taking should now be behind the white van going into the left hand lane.  Another part of the problem can be seen here, that is the diverging lines in the center of the image.  People seem to get confused with these and think that they have to leave the roundabout at this point, when in fact you can cross them and take that left hand lane where the van is.

ikea7This shot show where Saxon street from CMK joins the roundabout.  We should at this point still be behind the white van in the left lane.

ikea8At this point on the roundabout I see some lane discipline issues mainly due to people drifting back towards the right,  this is due to the curvature of the roundabout straightening and people not picking it up in time, and as such they have too much turn applied.

ikea9This is the last of the shots and shows the exit onto the East bound Bletcham Way.  At this point we should be on the far left behind the 4×4.

Posted in Uncategorized | Leave a comment

Pedestrian Crossings

There are 5 types of pedestrian crossing currently in use.  You can use this as a guide on how to identify them.

Zebra Crossing

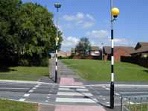
The Zebra crossing is the easiest one to identify because it has black and white stripes of equal width on the road surface.  It also has the flashing amber ‘Belisha Beacons’ on either side of the road. Cross1
Zebra crossings are marked by black and white painted strips across the road and flashing amber globes called ‘Belisha beacons’.
The highway code says that when a pedestrian moves onto the zebra crossing, approaching drivers MUST stop and should only start again once all of the pedestrians have left the crossing.  However, pedestrians should remain on the kerbside for safety’s sake until approaching vehicles have stopped.

Pelican Crossing

The Pelican pedestrian crossing is the most easily recognizable pedestrian crossing of all. It was the first pedestrian crossing to be controlled by traffic lights.
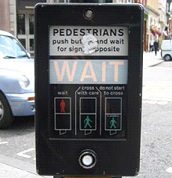
When a pedestrian walks up to a pelican crossing and presses the button they have to waitCross3 for the green man to show before crossing the road.  There is a continuous bleeping sound at a pelican type pedestrian crossing controlled by traffic lights for the benefit of the blind or partially sighted.
The Pelican crossing is the only pedestrian crossing to contain a flashing amber light in its phase.  The amber light that the drivers see at the pelican crossings flashes in time to the flashing of the green man that the pedestrian sees while crossings.
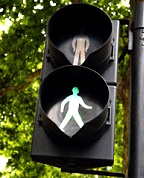
The pedestrians may still start crossing at a pelican type pedestrian crossing at any timeCross2 while the green man is flashing. Motorists should be aware that if the pelican type of pedestrian crossing is completely clear but there is a pedestrian about to use the crossing then the pedestrian has full priority.
Once upon the pedestrian crossing the pedestrian has priority until they have completely cleared the pedestrian crossing.
Pelican crossings have an audible warning that continues for as long as the pedestrian has priority to enter the pedestrian crossing.

Puffin Crossing

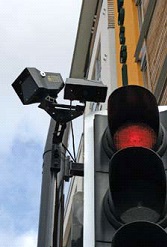
The Puffin crossing looks the same as the Pelican crossing from the drivers perspective.  The only difference to their appearance is the two infa-red guns usually on top of the lights which point down towards the pedestrians crossing.   Cross4
The puffin pedestrian crossing has two features which are designed to be particularly pedestrian friendly whilst crossing.
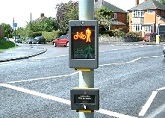
1) The red and green lights which tell the pedestrians when they are clear to cross are on the pedestrian side of the crossing, just above the button that they pressed, rather than higher up the pole.  This is much easier for pedestrians at puffin crossings who have sight related problems or who may be in wheelchairs.
2) The red light at Puffin crossings is intended not to change to green while there is a pedestrian still upon the puffin crossing. This is facilitated by the use of sensors.  Usually located on the top of the poles that hold the lights at the side of the puffin crossing.
Cross5We have all seen an elderly pedestrian crossing the road with shopping bags get half way across a pelican style pedestrian crossing before the lights change to green.  This puffin crossing system was invented for just such occasions.  The radar passes the information to the light control box as to whether or not there is any movement on the puffin crossing and the light control box reacts accordingly.  If there is still movement on the puffin crossing then the lights will stay at red until the slow pedestrian has finished crossing the road.
Puffin crossings also have an audible warning for pedestrians who wish to use the crossing.

Toucan Crossing

When using other types of pedestrian crossings, as you know, cyclists are supposed to dismount from their cycles when they use a pedestrian crossing.  If there is a cycle path that approaches the pedestrian crossing from one side and continues on the other side then it would be more convenient for the cyclists to remain mounted at the pedestrian crossing. Cross6
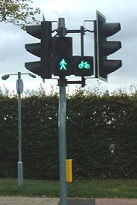
Commonly called the ‘two can cross’ pedestrian crossing the toucan style of crossing allows cyclists to use the crossing at the same time as pedestrians without the need for them to dismount from their cycles. Cross7 Cross8
There are two lights from the pedestrian/cyclist point of view at the toucan crossing.  A green man to time the pedestrians crossing and a green cycle to time the cyclists crossing. They will both turn green at the same time but the cycle will remain on green for longer because a cyclist can use the crossing faster than a pedestrian.
Toucan crossings may also have an audible warning to help both pedestrians and cyclists.

Pegasus/Equestrian Crossing

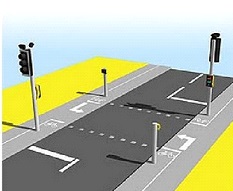
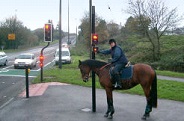
Pegasus style pedestrian crossings will only be found in areas where plenty of horse riders are expected to be crossing the road. Cross9
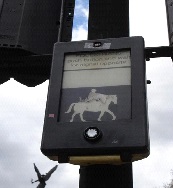
The Pegasus style of pedestrian crossing has an extra set of buttons two metres off the ground so that the riders have no need to dismount in order to activate the crossing.  In reference to the horses the vehicles will be made to stop farther away from a Pegasus style pedestrian crossing than they would from a normal pedestrian crossing.
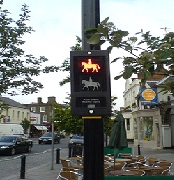
Cross10The lights that are displayed at a Pegasus crossing are different to normal pedestrian crossings as well. The green and red people have been replaced with green and red horses.
If the crossing is to be used by pedestrians and cyclists too, then a parallel toucan crossing is placed next to the Pegasus crossing.

The Pegasus crossing is quite rare. Only really found at places such as Newmarket where you can Cross11expect horses from several stables to need to cross at the same point.

Posted in Uncategorized | Leave a comment

Cheating the Test

The life’s of you and I at being but at risk by learners trying to cheat at the test according to an article written in the Mirror recently.  They appear to have gotten the information from a freedom of information request to the Dvsa.  It has highlighted a potential rise in the recorded cases for this financial year. From last April till the end of December there has been 677 reported cases of which so far 37 people have been jailed and 97 licenses have been revoked, there was also 55 cases of fraud convictions.

The highest number over the last 10 years has been 816 in 2011/12 and if the rate of this year continues then this should be surpassed.

What do you feel about this happening?

Posted in Uncategorized | Leave a comment

Practicing with your parents (Private Practice)

Learning to drive with family or friends can save you money and help you get to test standard quicker, but I recommend you still use a qualified driving instructor and just practice with family or friends.  You should also ask your driving instructor when they feel that you are competent enough that private practice with family or friends would be safe and of benefit.

If you are going to teach someone to drive you will need to use a suitable car that is insured for the purpose of teaching them.  You must have also held your licence for a minimum of 3 years and be at least 21 years old.  You must also have L-Plates clearly displayed both front and rear, these should be taken back off the car when the learner is not driving. It’s also recommended that you have a rear view mirror fitted so that your are aware of what is following you and you can help with appropriate action should the need arise.

Taking them out to early can knock their confidence if they are out of there depth and don’t let them develop habits that would have a detrimental effect on their driving. i.e poor steering techniques or not using the mirrors effectively.

If you are going out for the first time then you won’t really know what their driving is like until you have seen it. Always drive them to a quiet place ideally a quiet estate.  Do this even if they have had many driving lessons as they will need to familiarize themselves with the car and they may feel a bit nervous as they would have always had the safety net of an instructor with dual controls and helping where needed.

Learner drivers react slowly so give them plenty of time to do things and if they have not done something before or by the time you would have, then talk them through what they need to do.  You may find that if the learner panics that they freeze and stop responding to what you are saying and then things may go wrong.  If this happens or they do something dangerous then this can be frightening and stressful but it is important not to show any stress or fear or they will get very upset which you don’t want when they are behind the wheel.  Where possible pull over and discuss what happened. Try not to just tell them off, try to have a constructive discussion about it trying identify why they did what they did and what they should have done.

Tips for accompanying learner drivers:

  • Don’t expect them to drive as well as you!

Learners are learning and there may be areas that they are weak in, as such their control   of either the car or a situation may not be as good as you might expect.  Find out how good they are by starting of in a quite area and building up what they have to deal with as you become more confident in their ability.

  • Choose appropriate routes carefully!

Try and plan routes based on the ability of the learner.  Its no good taking someone who has only had a few lessons and expecting them to be able to cope on a busy roundabout with cars whizzing around them.  This could really knock their confidence or have a detrimental effect on them.  This could also be dangerous as they may panic and cause an accident.

  • Stop and Talk!

If the learner makes a mistake stop them when safe and appropriate and discuss what happened.  Talk about What, why and how.  What did you do?  Why did they do it? How they should have done it.  Once you have done this, if possible go and practice this so that they can work on improving their actions.  But this may not be possible to completely recreate the scenario.

  • Don’t Switch off!

Be ready for absolutely anything,  you should be able to identify any potential dangers,  the learner may not have so it would be best to ask them questions or point them out.  You must also be prepared for the learner to do what would seem a random thing to you.

  • Their Driving Instructor is “always” right!

If the learner does something different to what you would do yourself ask them why, but if they say that my instructor has taught me to do it this way then except this as correct at that time and talk to their instructor about it.  Remember things may have changed since you learned to drive or there may be a reason that the instructor has asked them to do it.  Remember that sometimes learners do tell “porkies” or may have mis-interprated what was meant.

Posted in Uncategorized | Leave a comment

What to expect on test day.

Like normal you will be picked up from home 1 hour before the start of your test.  You should make sure that you bring both parts of your driving license, also they ask you to bring your theory pass certificate, although I have never seen a pupil been asked for it.

During this hour before your test you have one last chance to go over anything that you would like to do.  I generally spend the time driving through some of the more complex areas so that they are fresh in your mind.

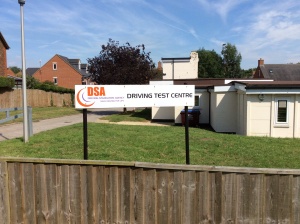
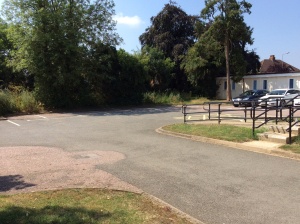
imageWe will head to Bletchley test center to arrive there approximately 5 mins before your start time.  You will need to reverse bay park into one of the candidate bays.

After parking we head over to the waiting room, you will have time to visit the toilet if needed.

The examiner will come out of their offices and call out the candidates name,  you should walk over to meet them.  They will ask to see both parts of your license,  while they check these they will ask you to read and sign the two declarations at the top of the DL25 (test report form).  These declarations  are to insure that you have lived in the UK for 6 out of the last 12 months and that the car is insured and suitable for test.

The examiner will ask you if you would like your instructor present on test and if you would like them present for the debrief at the end of the test.

imageAs you then walk outside you will be taken to the left hand side of the car park and be asked to read a number plate of one of the vehicles opposite. 20.5 meters

You should then show the examiner to your car, where they ask you two of the show me tell me questions.

During the test you will be asked to follow the road ahead unless road signs or markings tell you otherwise, or unless the examiner tells you a direction. The test will last approximately 45 mins during which time you will be asked to perform 1 maneuver plus possibly a controlled stop.  You will also be asked to drive independently for approximately 10 mins following either road signs or the picture that the examiner shows you.

When you arrive back at the test center you will be asked to drive forward into one of the empty bays and secure the vehicle.  The examiner will then take a few minutes to check test form and will then let you know the result of the test and what faults you may have committed.

Posted in Uncategorized | Leave a comment

Welcome to my new blog

Hi everyone,

I have decided im going to start a blog linked to LeaP School of Motoring so that i can pool tips and resources for pupils into one central focal point.

If you would like me to write about a specific area of driving or learning to drive then please feel free to send me a message.

Carl

Posted in Uncategorized | Leave a comment